Monday, April 13, 2009

Polluting Young Minds

Yesterday was pretty nice weather here in our nation's capital, so my buddy Kev and I met up for a play date for our sons. They've both recently received their first two wheeled rides, so we headed down to the Georgetown Branch extension for a little indoctrination on bicycles, riding in groups. Gotta start them young.


This is part of our merry band shortly after refreshments at Gifford's ice cream in Bethesda, conveniently located at the trailside. From left to right, my son Benchan, Kev, Kev's son James. Benchan insisted that he and James had to give the "V" sign in a group picture. All the little kids in Japan do this.


Another shot, from left to right, Kev's son James, me, my son Benchan. They are still working on the "V" sign.

I'm holding my Fuji America, which is newly on the road. I've despaired of finding a Fujita Professional saddle, so I mounted a pretty nice Fujita Belt instead.


I also replaced the bar end shifters with a set of Suntour Superbe downtube shifters.


Long time followers of this blog may recall that I applied a blue and yellow diamond handlebar harlequin wrap and that I've been somewhat ambivalent about the results. Recently, somebody observed to me that this is similar to the handle wraps on traditional Japanese swords, which makes me feel that this wrap style is a bit redolent of the Japanese heritage of the marque.


Well, with a brown saddle, it is starting to grow on me. It looks a lot better in person than in photos is all I can plead.

This example is in really clean, low mileage condition, and very trick with the chrome stays, fork, and fork crown.


It rides like a dream, inviting fast, aggressive riding. This was sold as a touring bike, but the geometry is really that of a sport bike. Lovely, lovely machine, one of Fuji's best offerings ever.


Friday, April 10, 2009

To Build A Fender

Most are familiar with the Jack London's story, "To Build A Fire", a cautionary tale about how a series of minor mishaps add up to catastrophe.

I'm beginning to feel that I'm midway into such a process with my VO fenders. Readers wishing to refresh themselves on this saga should start reading here, then here, then finally here.

This morning, after yesterday's bumpy rides yielded more fender/tire contacts, I decided that pending the job of moving to two fender/stay attachment points per stay, I would remove the leather washer from the eyelet and ensure that the fender is as precisely centered on the tire as possible. This is intended to be a provisional measure to reduce the incidence of fender/tire contact.

To remove the leather washer, I removed the front wheel, loosened the stay/eyelet mount, and removed the eyelet nut from inside the fender. Leaving the eyelet on the stay, I then pushed the fender inwards a bit to free the eyelet bolt from the fender and swiveled the eyelet on the stay so as to remove the leather washer. I then began reassembly.

As I was tightening the eyelet nut, the wrench suddenly went loose. The eyelet had failed. Sorry for the grainy, unfocused pictures.


The Velo Orange eyelets are open on one side. Here is what an intact one looks like.


While this simplifies installation, the open side causes stress concentration on the closed side. The Honjo closed eyelets don't have this issue:


In case anyone is wondering, I wasn't using a breaker bar. This is the dainty tool that was employed.


The Velo Orange eyelets are probably ok for light or general use, but not for a long-term bomb proof application. Ultimately, they will probably fatigue fail, although depending on conditions, it could easily be longer than the fender lifetime. However, I'm judging them insufficient for my application and ordering some more of the Honjo eyelets, enough for two per fender.

I did install the Honjo eyelet.


In addition to its stronger design, it is lower profile and presents a slightly cleaner appearance than the Velo Orange eyelet that remains, for the time being, on the rear fender.


After my experience with the front fender, I wasn't brave enough to remove the leather washer from the rear fender, since I only had one Honjo eyelet in stock.

I'm far from giving up on the Velo Orange fenders, though. The fenders themselves are far more rugged than Honjos. It is looking like a fully ruggedized setup will be two Honjo eyelets per stay combined with the Velo Orange fenders.

The Honjo eyelets are about $4.00 each, so this adds $16 to the setup costs. In addtion, one would then have two extraneous VO open eyelets. It would be nice if a fender package containing 4 Honjo eyelets instead of 2 VO eyelets were available for commuters, rough stuff riders, and others looking for the most reliable and durable setup possible.

Thursday, April 9, 2009

Single Eyebolt Fender Attachments - The Verdict Is In

Several days ago, while testing my newly installed Velo Orange fenders, I observed that they were significantly less rigid than fenders from other makers. Investigating this, I hypothesized that this was due to the single eyebolt attachment unique to the VO product.

To further delve into this, I sent Jan Heine, Editor of Bicycle Quarterly, the following email:

"Mr. Heine,

I'm doing a little investigation into an issue I observed while testing a set of Velo Orange fenders on a daily rider I'm building for myself. The issue is that the fenders seem to have significantly less lateral rigidity. When riding on rough surfaces, this effect of this is that the fender will frequently deflect enough to actually contact the tire.

I was rather surprised by this, as it never happened with Berthoud, Honjo, or SKS fenders on bikes I've ridden under the exact same conditions, some of which fenders were installed with substantially less clearance. So I've begun looking into this. The upshot is that I've concluded that the Velo Orange system of one fender/stay attachment eyelet results in a significantly less rigid or stable fender/stay assembly.

This conclusion is based upon several factors, the gory details of which are on my blog at http://nihonmaru.blogspot.com. First, just testing with my hand, the VO fenders installed on a bike are perceptibly less rigid when pushed side to side than Honjos or Berthouds currently installed on my other bikes. This was especially surprising for the Honjos, as off the bike, the Honjo is a lighter gauge aluminum that is readily observed to be more flexible. The second is sort of an thumbnail geometry evaluation (I have a fairly significant engineering background), that supports the idea that the VO attachment scheme would be substantially less rigid than a two attachment configuration.

The third is some historical investigation. I did some image searching of old randonneur and other fendered bicycles; all the images I found showed examples with two attachment points between stay and fender. This unanimity among the historical evidence suggested to me that the builders of yore had a pretty good reason for 2 attachment points per stay and perhaps I'm rediscovering something that was common knowledge in their community.

However, the documentation on the admittedly obscure topic of bicycle fender/stay attachment practices is pretty thin, to say the least; all I found were images, no real discussion of why things were fashioned this way. This is why I'm contacting you, to ask if you know anything about this in general, or if you know whether one stay/fender attachment schemes were ever common or even existed.

Any light you could shed on this would be much appreciated, as well as any indication of whether I can cite any or all of your response on the blog reference above.

Apropos of nothing, other than to demonstrate that the fenders are properly installed, here is the pedestrian workaday Fuji that has inspired this odd quest:

http://picasaweb.google.com/lh/photo/rtoVlpyvVFBnCsDG98d-wg?feat=directlink

Thank you,

Jay Roberts
Silver Spring, Maryland"

I had no idea how such a cycling luminary would respond to an oddball request from a plebe schmoe like me. I didn't have to wait long to find out because, to Mr. Heine's immense credit, I received the following response 55 minutes later:

"This is one of those things I picked up in the Singer shop. One day, Ernest Csuka said: "Yes, some builders use a single eyebolt at the back. Their fenders all break, because they can flex too much."

Indeed, even the superlight bikes for the technical trials used two eyebolts to mount the fenders. (The eyebolts were custom-made from aluminum to save weight.) A broken fender incurred more penalty points than the credit for lighter weight.

So yes, you are rediscovering what the old guys had found out in the 1930s. This also was discussed in Bicycle Quarterly's article on how to mount aluminum fenders.

Please feel free to quote the above on your blog.

Jan Heine
Editor
Bicycle Quarterly
140 Lakeside Ave #C
Seattle WA 98122
http://www.vintagebicyclepress.com

P.S.: The leather washers ONLY should go between frame and fender, not between the stay attachment bolts and the fender... As you point out, they don't do anything at the stay bolts, because the stays already are flexible."

Well, there we have it - single eyelet fender/stay attachments are a questionable practice, permitting the flexibility I observed. This flexibility is doubly pernicious because it poses an immediate safety hazard as well as causing premature failure of the fender. I take pains to emphasize will cause premature failure, rather than may cause, because, as we all know, aluminum has no lower fatigue limit.

Now, beyond the fender issue at hand, a tip of the hat to Mr. Heine for being so promptly helpful. In addition to reading my email and quickly responding, the content of his response indicates he took the time to view my blog entries on the issue.

In case any readers are unaware, Vintage Bicycle Press, while largely silent on the topic of Fujis, is one of the superpowers in the vintage cycling world. I've been meaning to subscribe to their periodical, Bicycle Quarterly, for some time now, only sloth and procrastination has prevented me from doing so. I do need to get off my duff and subscribe; I urge readers to consider doing so as well.

Vintage Bicycle Press also publishes a variety of books, most notably The Golden Age Of Handbuilt Bicycles. This is, hands down, the best book ever published on vintage cycles, both in its lush photography and informative text.

Mr. Heine, should you be reading this, thank you for your prompt and helpful response.

Wednesday, April 8, 2009

Fender Mount Design Issues

In this post, where I began doing some stress testing on my Gran Tourer setup, I detailed some issues uncovered with the Velo Orange 45mm smooth fenders. To recap, my finding was that on bumpy surfaces at speeds I am likely to take them at, the fenders, in particular the front, would sway around enough to contact the wheel. I could regularly reproduce this, and it is not a desirable operating condition. In the worst case, the leading edge of the fender could catch on the tire, possibly causing a crash.

I found this a little suprising, the VO fenders being rather beefier than the Honjo's, where I've experienced no issues. Similarly, the Berthoud fenders have never displayed this characteristic.
So I became a little curious and began investigating.

First, I tested the lateral resistance of a set of Honjo's installed on my wife's Trek 720. This test with the Honjos, pushing the fender side to side at the mount, required markedly more effort than doing so with the Velo Orange ones for a similar amount of deflection. Again, this was very surprising to me, given that the Honjo fenders themselves are of lighter gauge alumininum and the stays are of virtually identical stiffness.

Hence, I started thinking about the mounting system. The Honjos use two fender to stay attachment points, as shown below.


The Velo Orange fenders use one attachment point.


When you push the Velo Orange fender from side to side, you can see the gap between the fender and stay where dual mounts would be shrinking and opening - the single mount forms a pivot point, whereas dual mounts would form an arm, requiring more of the fender and stay to distort when swaying side to side (and hence, providing more resistance to sway).

The effect of the differing attachment schemes is clearly visible when pushing the test fenders from side to side. The Honjo's stays visibly bow a good deal in their straight sections, whereas this effect is much more muted on the Velo Orange fenders, where the fender just sort of rocks back and forth, pivoting on the mount.

I then looked at lots of old pictures of French randonneurs with this sort of fender/stay mounting and all the ones I found had dual mounts. Given that a lot of those builders were pretty weight conscious and dual mounts seems to be the standard, or at least very common, there must have been some acquired tribal/experiential knowledge there that single mounts weren't adequate for their conditions, much of which was unpaved roads, cobblestone streets.

I've got a few extra of these eyelets around, so I'm going to remount the Velo Orange fenders with two attachments per stay. Before I do that, I'll repeat the test with no leather washers - though they look nice, they really are not effective and do reduce the rigidity of the assembly. I'll be reporting on the results of this. If it does stiffen them up, perhaps it will also quiet them down a bit; I found them to be somewhat noisier than other fenders.

Tuesday, April 7, 2009

Sea Trials, Fender Woes

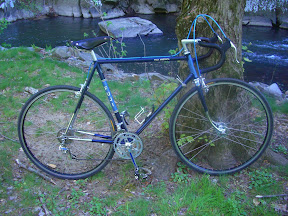
I had the opportunity to take 2 rides today to test out the Gran Tourer setup. This bike is being set up as my general purpose bike; I have pretty high standards for what that constitutes. Essentiallly, anything not bulletproof, smooth, and quiet is rejected. Anything short of being hit by a speeding coal truck should not cause rattling, buzzing, or clanking.

Life is too short to be messing around with subgrade parts and setup.

I have to go to Bethesda pretty frequently, about a 4 or 5 mile trip each way. If I chose, about 3 miles each way can be unpaved, with about a mile of that pretty bumpy, large gauge gravel. Blowing down that at an abusively fast pace is an excellent way to test if everything is tight and rattle free.

The first trip got pretty rattly, so I went home and found a few loose items. The pump actually broke free once, so I moved the mounts a little closer together so it is held in by more tension.

The second trip was much less rattly, which is good, and increases the signal to noise ratio for the few remaining issues. It turns out that there are three issues, all with the Velo Orange fenders.

One is the material - my impression is the VO aluminum fenders project more noise from minor grit and whatnot thrown up by the tire than do the Berthoud stainless steels ones to which I've become accustomed. They just seem noisy. Maybe it is something I could get used to.

The rear fender seems to have a little resonant buzz, probably needs some sound silencing pads (strips of inner tubes) where the fender passes near or contacts frame members.

The third issue is the most worrisome - on really bumpy stretches at full clip, I got the impression that the front fender struck the wheel a few times. This is what it sounded like and is not a good thing and possibly a safety hazard.

I had a bit of time to ponder this the rest of the ride home. Initially, I was quite pleased with the Velo Orange fenders, and one part of this was the ease of installation with only one fender mount per stay. Chris Kulczycki explained that with the heavier gauge aluminum, only one mount would be necessary.

That is probably true in terms of preventing fatigue failure in the fender, but if one examines the geometry, it is clear that this results in a less rigid arrangement that will allow the fender to sway more side to side and hence, strike the tire more easily than a two mount arrangement.

This is not good, although I suppose I could salvage these fenders for another bike. I haven't given up on it completely - I'm considering spreading the stays inelastically, then remounting, that way they will be under more tension, maybe this will be the margin of difference. Or perhaps one could use two mounts per stay, which probably would resolve the issue.

But even still, there is the noise issue, although I really need more rides and data to make a judgment there.

However, at the moment, it is looking like these may not be certifiable for extreme duty. This, to me means once installed and set up, I should get years of trouble free service w/no glitches or annoying issues in any sort of terrain to include unpaved and general abuse. In all fairness to Velo Orange, they don't market these things as suitable for 50 mile speed runs down the C&O towpath, etc, and 99 percent of riders will find them ok. They look like a million bucks, anyhow.

In other results:

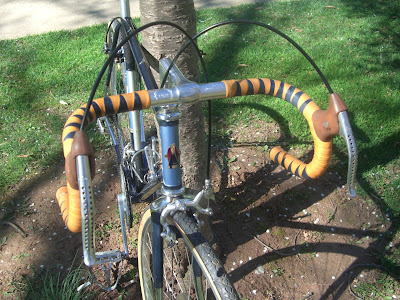
The Velo Orange front rack is bomb proof. All the other components I've swapped out are ok. The stock chain is noisy. The front brake squeals likes nobody's business, but I've got some toe adjustable pads to throw on there to test out.

All in all, dialing this one in. I sure hope I don't have to pitch the fenders.

Wheels For The Gran Tourer

I've been decommissioning my 1985 Trek 620, cannibalizing parts from it. The wheelset was a rather unlikely combination of 36 hole Sun CR-18 rims, straight 14 gauge spokes, and Campagnolo Croce d'Aune hubs. There is a third wheel to match with a Schmidt Dynohub.

The theory behind these wheels was something bombproof and good looking. They have been bombproof - in eight years of hard use, they have never broken a spoke or even needed to be trued. These days, Croce d'Aune, the poor man's C-Record, may seem an overly refined component for commuting type wheels, but ten years ago this stuff was available for pennies essentially.

The looks speak for themself - I'm running similarly bombproof Specialized Armadillos:


The CR-18 rims, at 22mm, are narrower than the 25mm stock Arayas. The CR-18s also have a higher profile and are shinier. This gives the bike a bit more of a modern, flashier look than the more conservative, retro stock rims. Both looks work for me.

The Croce hubs are fabulous. Despite their years of use, they are still smooth as butter and cosmetically perfect. The axle housing has a graceful sculpted profile:


The chromed grease port cover clip is more subtle than the black ones on earlier Records.

The Croce quick release levers solved a minor nit. The Sunshine levers, like many QR levers, had a cap nut securing the lever. On the front wheel, this cap nut interfered with the rack/fender mount. Hence, the quick release lever had to face forward or down. This sort of thing is actually a big deal to obsessive people and had somewhat diminished the joy of the new front rack.

The Croce levers do not have this cap nut - the lever is secured internally. So, all is well in the QR lever positioning department:


This bike is approaching a state where it is ready for full, unlimited duty. The last major feature is getting a drive train that I can comfortably pull a trailer loaded down with 45 lbs of child and supplies for 50-70 mile day trips. Astute readers may notice that I've provisionally swapped the stock 42 tooth inner chainring for a 39 that was lying about.

But a triple is really needed - I'm hoping against all hope for a Sugino Mighty Tour. This loses the Fuji engraving on the crank arms, but is a high quality, non-swaged crankset. If I just can't bear to lose even one "Fuji" from a bike that positively bristles with the brand, I'll put on Fuji branded Super Maxy. While swaged, they are pretty high quality and are very often set up as triples.

That is not to take anything away from the stock crank, which is pretty attractive. If I didn't have to pull a trailer around, I'd probably go out and buy a 34 or 36 ring, leave it a double, and call it a day.


Sunday, April 5, 2009

Velo Orange Front Rack


I purchased a Velo Orange constructeur front rack about 1 year ago even though I didn't have an immediate application for it. With quality construction, hand made out of stainless steel, classically styled with no compromises, there was no doubt in my mind that this would end up on one of my bikes eventually. It wasn't cheap at $120, but it is a lifetime product that is expensive only by comparison to the sort of disposable products that now dominate the bicycle aftermarket.

This rack has been bouncing around the shop since purchasing it; I hadn't really been able to decide on which bike to install it. Plus, looking at it, I knew it was going to be a non-trivial job getting it right.

I finally decided to install this on my 1981 Fuji Gran Tourer SE because this is going to replace my Trek 620 as my everyday errand bike. It has been a nice 9 years with the Trek, but I always felt that it was a bit small for me. And then, the other day I realized that even with size XL toe clips (with leather covers..), 32's running on 27" rims, with fenders installed for generous tire clearance, there still was no toe clip overlap with the front wheel.

Deal closed....

The rack comes less as a finished bolt on product than as something for an OEM to finalize to their application. The good part of this is that when installed, it easily looks like something that came with the bike rather than off the shelf at the LBS. The downside is that it is a little more effort and skill to install, if that counts as downside.


There are no holes drilled for the fork or crown mounts. One must decide how to attach to the fork crown. I considered attaching it to the brake mounting bolt, but opted instead to attach it to the fork crown fender eyelet for a cleaner look and to not intrude upon the brake mount ecology of spacers and such.


When fitting this up, one must ensure that the several holes are drilled in their correct locations without ever having the benefit of a completely in situ dry fit. So one does a lot of holding things in place, measuring twice, preliminary bends in the fork crown tang for sorta dry fits and so forth.

This is not a job for the faint of heart. It is steel, and the tangs, especially the lower ones, are quite beefy. Use the absolute best drill bits and lubricate with oil when drilling. Use a metal punch to give yourself a pilot divot for the drill bit. A hacksaw and some files are necessary for cleaning up the final product. All in all, it is a pleasant industrial age project, and executed carefully, yields fabulous results.

In my case, I drilled the fork tangs first. Then, with fender and fork crown fender eyelet removed, but front (and rear wheel) installed, I mounted the rack. This allowed me to shape the crown tang to avoid the brake and end up at a level just even with the bottom of the fork crown. Then the rack was pivoted on the fork eyelets to determine the level position for the rack, and the crown tang marked for drilling.

When this was completed, the rack and fender were mounted and the fender marked for the bolt to secure the fender to the rack. This was followed by more disassembly, more drilling, and then final assembly.

Note the nice fender line and the fact the the fender attaches directly to the mount on the rack with no spacers. I went for broke on this; one could be a bit more cautious, drill the fork mount holes a little further down the tang, then adjust fender line at the rack fender mount with a few washers. But then it would look so clean and OEM. It is a bit of a gamble, and if the rack is a bit low, then one is faced with elongating the fork tang holes, so don't say you weren't warned.


The Gran Tourer, like most bikes, has only one fork eyelet per dropout. This further complicates matters. I ran an allen bolt through the eyelet from the inside to provide a stud for mounting both the rack and fender connections. The fender p-clamp goes on first, and then a nut to tighten the clamp. This nut also serves as a spacer to provide the inner surface for the rack tang far enough out such that the tang clears the fork. The tang is then secured with another nut, I used acorn nuts for appearance. This looks a little more finished, but one also has to be careful then with stud length.

Another advantage of using a stud this way is security. If the nut comes loose, the rack and fender are still mounted, albeit loosely, so nothing is going to get jammed in a wheel. It takes a fair amount of effort to spread the tangs over the stud ends to fit them into their mounting holes, so they definitely will not fall out of place if something comes loose. Plus, you won't loose any fender mounting clamps in the weeds either.


Of course, I had my Ostrich handlebar bag with me.


Overall, this rack wins a coveted 5 Otakus, the maximum, on the product rating scale. There is little to improve upon either functionally or cosmetically. It is sturdy and the stainless steel will look good forever. It is versatile, allowing for handlebar bags, panniers, and accessory mounts. The only other product I've been so pleased with in recent years is the Schmidt Dynohub (SON).

Yes, the installation is a bit difficult, but it is precisely this difficulty that allows the rack to be installed with a fully integrated, custom look. In my opinion, the ability to customize installation is a product feature, not a failing.

One hopes that cyclists are not deterred by the installation and that Velo Orange continues to offer this rack. I've got a couple of other bikes that could use one of these.