
I purchased a Velo Orange constructeur front rack about 1 year ago even though I didn't have an immediate application for it. With quality construction, hand made out of stainless steel, classically styled with no compromises, there was no doubt in my mind that this would end up on one of my bikes eventually. It wasn't cheap at $120, but it is a lifetime product that is expensive only by comparison to the sort of disposable products that now dominate the bicycle aftermarket.
This rack has been bouncing around the shop since purchasing it; I hadn't really been able to decide on which bike to install it. Plus, looking at it, I knew it was going to be a non-trivial job getting it right.
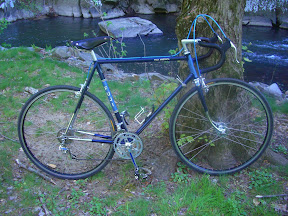
I finally decided to install this on my 1981 Fuji Gran Tourer SE because this is going to replace my Trek 620 as my everyday errand bike. It has been a nice 9 years with the Trek, but I always felt that it was a bit small for me. And then, the other day I realized that even with size XL toe clips (with leather covers..), 32's running on 27" rims, with fenders installed for generous tire clearance, there still was no toe clip overlap with the front wheel.
Deal closed....
The rack comes less as a finished bolt on product than as something for an OEM to finalize to their application. The good part of this is that when installed, it easily looks like something that came with the bike rather than off the shelf at the LBS. The downside is that it is a little more effort and skill to install, if that counts as downside.

There are no holes drilled for the fork or crown mounts. One must decide how to attach to the fork crown. I considered attaching it to the brake mounting bolt, but opted instead to attach it to the fork crown fender eyelet for a cleaner look and to not intrude upon the brake mount ecology of spacers and such.

When fitting this up, one must ensure that the several holes are drilled in their correct locations without ever having the benefit of a completely in situ dry fit. So one does a lot of holding things in place, measuring twice, preliminary bends in the fork crown tang for sorta dry fits and so forth.
This is not a job for the faint of heart. It is steel, and the tangs, especially the lower ones, are quite beefy. Use the absolute best drill bits and lubricate with oil when drilling. Use a metal punch to give yourself a pilot divot for the drill bit. A hacksaw and some files are necessary for cleaning up the final product. All in all, it is a pleasant industrial age project, and executed carefully, yields fabulous results.
In my case, I drilled the fork tangs first. Then, with fender and fork crown fender eyelet removed, but front (and rear wheel) installed, I mounted the rack. This allowed me to shape the crown tang to avoid the brake and end up at a level just even with the bottom of the fork crown. Then the rack was pivoted on the fork eyelets to determine the level position for the rack, and the crown tang marked for drilling.
When this was completed, the rack and fender were mounted and the fender marked for the bolt to secure the fender to the rack. This was followed by more disassembly, more drilling, and then final assembly.
Note the nice fender line and the fact the the fender attaches directly to the mount on the rack with no spacers. I went for broke on this; one could be a bit more cautious, drill the fork mount holes a little further down the tang, then adjust fender line at the rack fender mount with a few washers. But then it would look so clean and OEM. It is a bit of a gamble, and if the rack is a bit low, then one is faced with elongating the fork tang holes, so don't say you weren't warned.
The Gran Tourer, like most bikes, has only one fork eyelet per dropout. This further complicates matters. I ran an allen bolt through the eyelet from the inside to provide a stud for mounting both the rack and fender connections. The fender p-clamp goes on first, and then a nut to tighten the clamp. This nut also serves as a spacer to provide the inner surface for the rack tang far enough out such that the tang clears the fork. The tang is then secured with another nut, I used acorn nuts for appearance. This looks a little more finished, but one also has to be careful then with stud length.
Another advantage of using a stud this way is security. If the nut comes loose, the rack and fender are still mounted, albeit loosely, so nothing is going to get jammed in a wheel. It takes a fair amount of effort to spread the tangs over the stud ends to fit them into their mounting holes, so they definitely will not fall out of place if something comes loose. Plus, you won't loose any fender mounting clamps in the weeds either.


Of course, I had my Ostrich handlebar bag with me.


Overall, this rack wins a coveted 5 Otakus, the maximum, on the product rating scale. There is little to improve upon either functionally or cosmetically. It is sturdy and the stainless steel will look good forever. It is versatile, allowing for handlebar bags, panniers, and accessory mounts. The only other product I've been so pleased with in recent years is the Schmidt Dynohub (SON).
Yes, the installation is a bit difficult, but it is precisely this difficulty that allows the rack to be installed with a fully integrated, custom look. In my opinion, the ability to customize installation is a product feature, not a failing.
One hopes that cyclists are not deterred by the installation and that Velo Orange continues to offer this rack. I've got a couple of other bikes that could use one of these.
Another advantage of using a stud this way is security. If the nut comes loose, the rack and fender are still mounted, albeit loosely, so nothing is going to get jammed in a wheel. It takes a fair amount of effort to spread the tangs over the stud ends to fit them into their mounting holes, so they definitely will not fall out of place if something comes loose. Plus, you won't loose any fender mounting clamps in the weeds either.
Of course, I had my Ostrich handlebar bag with me.
Overall, this rack wins a coveted 5 Otakus, the maximum, on the product rating scale. There is little to improve upon either functionally or cosmetically. It is sturdy and the stainless steel will look good forever. It is versatile, allowing for handlebar bags, panniers, and accessory mounts. The only other product I've been so pleased with in recent years is the Schmidt Dynohub (SON).
Yes, the installation is a bit difficult, but it is precisely this difficulty that allows the rack to be installed with a fully integrated, custom look. In my opinion, the ability to customize installation is a product feature, not a failing.
One hopes that cyclists are not deterred by the installation and that Velo Orange continues to offer this rack. I've got a couple of other bikes that could use one of these.
No comments:
Post a Comment