Sunday, April 26, 2009

Sunday Outing

Here at Fuji Otaku, we write a lot about the assembly and style of bikes, which could lead some to believe that we never ride the things.

Nothing could be further from the truth - the only hangar queen around here is my Mondia and that is simply because Mrs. Otaku says that I'm still a bit too heavy to be seen on such a gorgeous machine.

So in the hopes of burning off some of that lard, we went out on a family spin today. I was riding my recently worked upon Fuji Gran Tourer pulling my son in a trailer.

Most of the riding was roads and pavement, although we got a bit of offroad at Lake Needwood. Here you can see my rig:


And here is a lovely Trek 720 with an even lovelier Mrs. Otaku.


If you can tear your eyes away from Mrs. Otaku and look closely at the front fender stay, you can see that it is bent from some forgotten mishap with a stick. If you ride long enough with fenders, this will happen. Pristine front fender stays are one indicator of a bike that isn't getting ridden enough or has an exceptionally careful rider.

And shortly after these pics were taken, the Fuji Gran Tourer had its first tangle with a stick, bending the front fender stay a little, so I guess it is broken in now.


Wednesday, April 22, 2009

Back In The Black

I was talked off the ledge about the white brake hoods on my 1981 Fuji Gran Tourer SE. I also decided that the red lacing on the Toshi leather bar covers, while attractive in isolation, wasn't cutting it on the bike. It was really too fancy and colorful for this bike, which is sort of puritanical in black and plain silver components.

So I dyed the lacing black, slipped on some black brake hoods. I took this as an opportunity to install some silver braided steel brake cable housings, keeping with the black and metallic look of this bike.

Here is it:


I kept the chromed plastic bar plugs.


This Toshi leather wrap makes your bars look like a supermodel in a wetsuit. The right side (the drive side) went on a little tighter, and is almost completely wrinkle free.


Here is a detail shot of the new brake cable housing.


Adieu for now.


Tuesday, April 21, 2009

White Brake Hoods

I'm still undecided on these white brake hoods with the Toshi leather bar wrap. So I went outside at took some pictures in the noonday sunshine.


I'm thinking that this may not be working. The handlebar assembly looked ok on the workbench, but on the bike, those hoods seem a little out there. Opinions?

Monday, April 20, 2009

More Toshi Leather Stitch On Handlebar Wrap

In the spirit of continuing the product research on the Toshi stitch-on leather handlebar wrap, I decided to install the handlebars with the damaged right cover. While I finally came up with what seems to be a suitable installation protocol, it is yet to be determined how well this will work once the item is in the field. Hence, I'm going to wait until I see if any further issues arise from daily use before installing the replacement covers that Ben's Cycle is shipping me free of charge.

I'm also considering attempting to repair the damage, which is several torn eyelets, to understand if this is possible on this not inexpensive product. This would be good to know for future reference.

These bars are slated for my 1981 Fuji Gran Tourer. Currently, it has black brake hoods, but I thought it may be interesting to try these off-white, sort of ivory hoods. This matches the decals on the Gran Tourer and the white Campagnolo laminated toe clip straps.

Here is how the bars look built up.


A view from the rider's side.


I think the contrast is nice rather than using black hoods.


Those are NOS drilled Dia-Compe brake levers, period correct and all.


I had some chromed plastic bar plugs rattling around (never throw away anything...).


Here are a couple of night-time shots on the bike in the gloom of my garage. The flash makes the hoods look a lot brighter than they really are.


I'm thinking of using this Jagwire brake cable housing for a bit of sparkle but keeping with the black/silver aesthetic of the bike.


Toshi Stitch On Leather Handlebar Cover


Remember those Cinelli bars from the 80's decked out in Almarc leather? Boy, I sure do - sexy Italian curves covered with tight, wrinkle free leather, the James Bond girl of bike parts. And nowadays, as equally inaccessible as a James Bond girl to most of us.


However, I once had a set in yellow leather on my full Campy Tommaso. One day, in a moment of youthful disdain, I decided that I was sick of the yellow and discarded them as blithely as I would a romantic interest that no longer intrigued.

Those were the days, and they are appreciated much more in retrospect than in the moment. Unfortunately, for those of us wishing to relive those times, stitch on handlebar covers have been rather rare of late. Yes, Velo Orange does offer a fine Elkhide cover, but it is less of an exotic Mediterranean beauty than a stolid Marge Gunderson in its somewhat plump and rustic manner.

To the rescue, it would seem, is Toshi with a stitch on leather cover. The pictures of the smooth, fine grain leather and tightly stitched edges drove me over the edge, so I could no more resist ordering some than I could taking my next breath.


As is common with affairs of the heart, it cost me - in money, time, and heartbreak. I could go on for hours about my various attempts to get these right and the imperfections that remain. But no joy is without its costs, and despite its flaws, Toshi delivers.


This is an endeavour for the bold and resourceful. No instructions are provided, and the supplies are incomplete; certainly, two needles rather than one should be provided and the black thread was not nearly long enough. But these deficiencies challenge one to make this one's own, in this case learning stitching techniques, substituting a more ample supply of red thread, devising strategies to prevent the cover from slipping around the bars.


The slippage is a particular challenge, many suggest vexatious remedies such as double-sided tape or first applying a substrate of cloth tape. However, there is a delightfully easy gambit that will not complicate the installation nor compromise the aesthetics, and that will leave the covers so stable that it would take a pipe wrench to move them. I'm surprised that the several manufacturers of these products have not figured this out and recommended it to their customers.

While gentlemen do not tell all, sometimes they provide a hint of their trade secrets. Consider the following:


Update: Ok, what I did was apply some shellac to the bars and let it dry before installing the covers. This provides more than enough tack to keep the covers in place while not at all complicating the laceup process. There is no need to use double sided tape, cloth tape substrate, or excessive tension. Anybody selling these types of covers should include this option with their instructions, imo, were they even to include instructions of any sort.

In closing, The Toshi leathers are beautiful. A cold hearted calculus would suggest 3 Otakus (out of 5) at best for this product. They are expensive, incomplete in the needle/thread, and bereft of any instructions. They are finicky to install, getting the stitching to look good, running a fair line with a consistent pattern. One false move and the soft leather stitching holes can tear, an irreparable tragedy. But despite these obstacles, they do offer the possibility of fulfillment to those who can complete the course.

So I can't separate my heart from my mind on this product and will simply leave you with the thought that the dream is alluring, the reality is harsh, and the choice is yours.


Update: Learning the ropes for a proper installation required me to lace and unlace the right cover repeatedly. Eventually, several of the eyelets failed. This damage is discreetly avoided in the pictures in this posting.

I presented my sad story to Ben's Cycle where I purchased these. They responded in a blink of an eye, telling me that they would ship me another set immediately.
All hail Ben's Cycles for their prompt and understanding response that wins them a coveted 5 Otaku vendor rating.

Friday, April 17, 2009

Cranks For The Gran Tourer

Yesterday, I received this Sugino Mighty Tour crank in exchange for some parts from my decommissioned Trek 620:


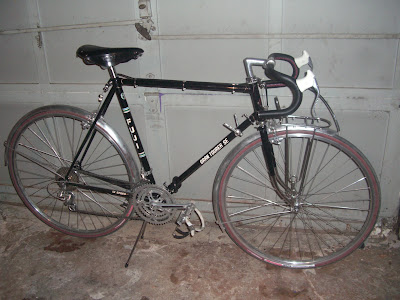
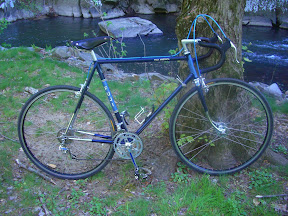
Currently, I'm stroking my 1981 Gran Tourer to become a bulletproof daily rider. For old guys like me that do things like pull my kid in a trailer, that means a triple. Plus, the stock Maxy double, while quite nifty with "Fuji" pantographs, has a swaged on spider. This is usually fine, but for ultimate abuse and reliability, an integral spider is more reliable.

The crankset cleaned up nicely:


I decided not to de-anodize it, as there were no big gouges to sand out. Also, the Gran Tourer is tending towards matte silver rather than polished.

I did paint the flutes and logo.


Then I popped it into the the oven for one and half hours. Warning kids, don't try this when your wife is at home, or my wife anyhow.


Along with this crank, I purchased a Sugino Mighty Tour bottom bracket from The Bike Stand. Unlike the Maxy bottom bracket, this one has machined bearing surfaces on the cups and spindle. It weighed in at 270 grams.


The fixed cup, apparently in place for 28 years, was no match for the Sheldon cup remover gambit.


The outgoing Maxy bottom bracket weighed in at around 330 grams. I said a silent prayer of thanks to the unknown previous installer who had liberally greased the cup threads. Then I did the same for my posterity when I installed the new cups.


So on the bottom bracket, we're sixty grams in the black on this swap.

The Sheldon fixed cup tool is also good for installation. Following this, 22 grade 25 bearings, and a lotta grease, the bottom bracket is installed. Always be careful to not cross thread the cups and use nothing other than your hand until it is engaged several turns, ensuring no cross-threading. Nothing will ruin your day more than destroying the threads on a bottom bracket.


The outgoing Maxy double cranks weighed in at around 580 grams.


The incoming Mighty Tour triple weighed 640 grams.


So on the crank swap, we're 60 grams in the red, neutralizing the 60 gram weight savings on the bottom bracket swap. However, at the cost of no weight gain, the bike is now a triple, has a stronger crank, and a smoother bottom bracket. And all of this is period correct as well as keeping with the Fuji/Suntour/Sugino theme of the bike. This is vintage wrenching at its best...


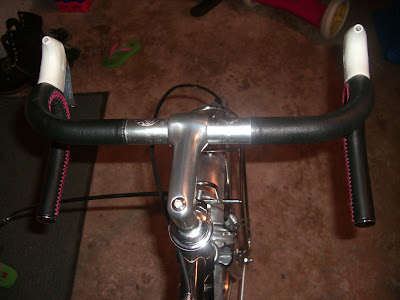
The existing Suntour Compe V front derailleur and the Fuji branded Suntour Vx mid-cage rear derailleur accommodated the wider range on the 14/30 rear cluster with minor adjustment to the front stop. On the smallest 34 front ring, the chain goes slack on the 4th cog. However, on the large/large combination, at least one or two links of slack is left. I don't know if I'll take advantage of this, as small front ring/small rear cog combinations are not really cricket. Maybe I'll do this next chain swap.

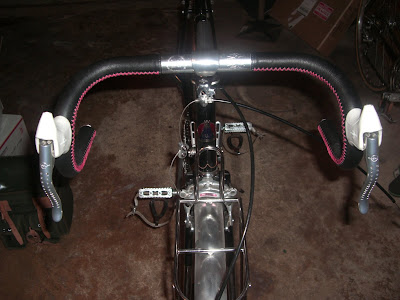
The chainline, at 46 mm to the middle ring, ended up very slightly outboard of the standard 45 mm. This is pretty minor, but I do have a 118.5mm Mighty Tour Spindle, whereas the one used on this installation is 120mm. There appears to be enough stay clearance to move this in a bit, but like the chain, is such a minor issue that should I even address this, it will be when the system is taken apart for some other reason like routine maintenance.

The lowest gear, 34/30, is pretty low, but still not the stump pulling action that I had on the Trek 620 at 26/30. Conceivably, I could go to a 34 rear cog in the rear, possibly a TA small front ring at 33t, but I'll see if I really need this additional grunt.

Now, do I have to change the stay decal?


Thursday, April 16, 2009

Sugino Cranks, Christophe Toeclips, Etc.

My quest to acquire some vintage 110 BCD Sugino cranksets is beginning to pay off.

First, I swapped the frame for my decommissioned Trek 620, part of the loot from this included a curious Sugino Mighty Tour:


Apart from the non-factory paint, if you look closely at the pictures, you can see that the flute and the logo on the crankarms don't exactly match. On the drive side arm, the logo is a bit smaller and the flute is tapered compared to the non-drive side arm.

On the back side, we can see that the drive side arm is has the typical flute with "Mighty Tour" in raised letters, where the non-drive side has no flute or lettering.


Looking more closely, one can see that the drive side is NOS, never mounted:


Finally, the date codes don't match on the arms:


Being on different sides of the bike, no one would ever notice these details, but I'm officially looking for a perfect match, other than date code, for the drive side arm. It is pretty rare to find a set of these NOS, and I'm halfway there.

Swapping out some of the other parts from the Trek 620 yielded another Sugino Mighty Tour crankset:


This one is well used, but still very nice cosmetically. We can see that the 52 tooth big ring is drilled for a chainguard ring. Notice that these early triples used a 110 BCD innermost ring instead of the now commonplace 74 BCD:


These were just all stacked up on special long chainring bolt hardware. Also note that the non-driveside arm is engraved and emblazoned with "Mighty Tour". The outside flutes on this set seems more similar to the non-driveside arm fluting on the previously described set.

I then hopped over to The Bike Stand, which has a little vintage parts thing going on. Unlike some online vintage parts dealers, their prices, while not a giveaway, are fair and reasonable, items are as described, shipping is fast, and Steven Willis is an all around good guy to deal with - they get 5 Otakus (out of 5) on the vintage supplier rating scale.

I picked up a bottom bracket for the Mighty Tour, most of the parts are NOS, with the exception of the very cool adjustable cup, which still has lots of miles left in it.


The Mighty Tour/Mighty Compe cranks have the same taper as old NR/SR cranks, ISO, and spindle lengths, actually, the Mighty Compe cranksets overall were pretty much a copy of Campagnolo NR crankset, so this puts one in some competition with the vintage Campagnolo crowd for these parts.

Finally, I spent a little time putting some Velo Orange toe clip leathers on a nice old set of Christophe Special toe clips.


These leather covers are a wonderful little product that add a nice touch for only four dollars or so; I've taken to putting these on all my bikes. I've done enough of these that I can apply a set pretty quickly now, maybe 30 minutes total for all four covers.

I love the logos on these old clips:


That's all for now. Happy wrenching and riding.