Friday, April 30, 2010

Planet Bike Mud Flaps

Those following my 1972 Fuji Finest build will recall that I opted for 45 mm SKS silver chromoplastic fenders.  There were a variety of reasons for this - they fit the look of the bike, I've sort of had my fill of metal fenders for a while, and so forth.

I ended up being pleased with these fenders with one exception - the front fender doesn't have a mudflap and doesn't extend particularly low.  So while this is good enough to protect the rider, it provides only a minimal shield  from the abrasive laden gunk that sandblasts one's drive train when riding in the wet.

The chromoplastics are strong enough to support a leather mudflap, of which I have several lying about.  However, just as with metal fenders, I'm a bit cool on leather mudflaps these days.  They look sharp when first installed, but after some time being put to their intended purpose - i.e, being sprayed with mud - they get limp and floppy.

The sleekly shaped mudflaps on the Planet Bike fenders recently installed on the 1981 Fuji America weren't helping the case for leather mudflaps either.

On a whim, I went looking around the Planet Bike website and, goodness gracious, they sell mudflaps (and other replacement parts, such as stays) for their fenders.  So I ordered a 45 mm set, a deal at USD 5 with free shipping.  For informational purposes, they sell these in sets of two with plastic attachment rivets.

Planet Bike must have sensed that I was having a serious mudflap crisis because only two days later the mudflaps arrived on my doorstep.  I installed one on the front fender this afternoon in about 5 minutes:


Since I only care about myself (ask Mrs. Otaku about this sometime), I didn't put one on the rear, although I may should I ever feel an unfamiliar stirring that I identify as concern for others.

Anyhow, these are very nice looking mudflaps at an unbeatable price and, if this is what one is after, much more form-fitting than a leather mudflap. They come in a number of sizes.

Being aware that many readers do not share my current ambivalence about metal fenders, I test fitted one of these mudflaps to a Velo Orange 45mm aluminum smooth fender and it was quite a nice fit. Although I didn't have samples to test, I expect they would work with hammered and fluted fenders just as well, as the mudflaps are rather flexible.

Sometimes the good things in life might not be free but are at least cheap and have free shipping.  Kudos to Planet Bike for selling these as individual parts.

Tuesday, April 27, 2010

1972 Fuji Finest Slides Down The Ways


Finished up my 1972 Fuji Finest today.  Well, these things are never finished, but I got v1.0 up and running in time for the the traditional late afternoon picture taking and shakedown ride.


The Suntour V Luxe GT rear derailleur didn't want to play nice with a 7 Speed 13/28 IRD freewheel.  It didn't seem to have enough travel to get to the low gear and when shifting to the biggest cog, the derailleur cage interfered this the spokes.  I still want to use a derailleur of this type but I didn't have time to investigate or test another one, so I just installed a Suntour Cyclone GT I had handy for the time being.


I ended up using a set of 27" wheels with Sun CR19 rims laced to Campagnolo Croce d'Aune 36 hole hubs.  In a previous post, I described how I saved the rear hub from a possible dumpster fate.


Campagnolo C-Record and Croce d'Aune hubs have the most elegant spindle of any hubs I've ever seen.


The previously cut rear fender stays are a little short for this wheelset, but I think I can swap them out with the some of the fender stays on my 1981 Fuji America.  These haven't been trimmed yet and it looks like the America can use shorter stays than the Finest.


The relatively short 54 cm top tube has me wondering whether I should have used a stem with more extension or whether I am just not used to this position.  Time will tell on this.


The Finest has a very plush ride.  This is the first bike I've been able to ride Specialized Armadillos at 100 psi on gravel without my teeth being shaken out of my head.  My 10 mile test ride had about 6 miles of gravel, so I had plenty of time to make this observation.  My thought is that if I were doing a towpath century, this would definitely be the go to bike.


I ended up going with Dia Compe DC510 brake calipers rather than the Dia Compe Gran Compe ones.  The biggest reason for this was the DC510 are slightly exotic and unusual, although the brake pads are easier to adjust.

The small pulley on the nifty Dia Compe straddle wire hangers gives a lot of mechanical advantage.  At first blush, this feels like mushy brakes, but it is quite easy to lock the rear wheel.  One just has to pull the lever far enough.  The upside of the is very fine brake modulation.  Again, time will tell whether this needs to be addressed.  One simple way to do so and still retain the blingy hangers is to use slightly shorter straddle wires.


I'm guardedly optimistic about the Brooks Imperial saddle. There is a noticeable lack of pressure in one's nether regions, especially for a brand new saddle. Riding with non-cycling, civilian shorts, I did feel the edges of the cutouts a few times, making me think that padded shorts may be better for this saddle. However, that sensation diminished by the end of the ride, raising the possibility that this is an issue that will disappear as the saddle is broken in. Again, another issue about which time will tell.

Everything worked fine on the approximately ten mile test ride; there were no emergency adjustment stops necessary. Even the fenders were buzz free - I took a bit of care in the installation to put sound dampening bits of scrap bar tape at contact or close fit areas between the fenders and frame.

Overall, I'm quite pleased with this build which has been two years in the making. I put everything together, other than the fenders, with various parts and supplies I had in-house.

If the weather holds, I may try a longish C&O towpath excursion this weekend to further shakedown this bike.

Save The Wheels

About two weeks ago, I made a pretty boneheaded error when I was removing a freewheel.

The way I remove a freewheel is to secure the freewheel removal tool a bit loosely on the freewheel with the quick release skewer.  I then position a one inch box wrench in the wood vise at the end of the bench, insert the freewheel tool into the now well secured box wrench, and turn the wheel like a big bus steering wheel.

Most of the time this gives so much leverage that the freewheels just spin right off.  However, this wheelset had been subject to a lot of 28 chainring/34 cog hauling my not insignificant butt plus a trailer full of kid, picnic supplies, and the kitchen sink up many, many hills and over many many miles.

So that freewheel was on there and after struggling with it for a good long while, I almost gave up, but finally about fifteen minutes of grunt work did the trick.  I was so relieved at this I spun it a few turns and was idiotically wondering why it was getting hard to turn again. 

But flush with the initial victory I persevered until that dreadful realization dawned on me that I still had the quick release in place.

After removing the freewheel, I made a couple of unsuccessful attempts over the past several weeks to remount a freewheel, but even though the threads looked quite good, apparently I had munged up some of the initial engagement section on the hub.  Try as I might, I just couldn't get a freewheel threaded correctly.

And these weren't just any old wheels.  The rims are nothing special, just some polished Sun CR18, but the hubs are a nice set of Campy Croce D'Aune 36h that I've been very fastidious about repacking and consequently have many years of service left.  Back in the day when I bought these, people were practically giving them away, but they are pretty spendy now.

The reason I was mucking around with the freewheel in the first place was that this was my first choice for a wheelset for the 1972 Fuji Finest over which I'm currently obsessing.  But since I had apparently screwed the pooch with the Croce wheels, I put a nice set of wheels with Campagnolo high flange Nuovo Tipo wheels on the Finest.

I also have been making my peace with ruining this rear hub - the past few days I felt like I was getting to the acceptance stage.  I've never ruined a hubset before while working on them, especially such a nice one with such a stupid move, so this was a bit of a bitter pill.

But I hadn't accepted this fate because this evening I was overtaken with a grim determination to give it one last try.  I assembled my materials, took a five deep "serenity now" breaths and headed out to the garage.

To prepare the hub, I cleaned and then carefully burnished the hub freewheel threads with a stiff toothbrush until they positively gleamed.  Then I located two english threaded bottom bracket lock rings, one tight fitting, the other loose fitting - I was fortunate to have such a selection available.

Then with the loose fitting lock ring, I started carefully attempting to thread it onto the hub.  This was like being a safe cracker, first turning counter clockwise until I thought I felt a little bump that would indicate the thread ends of the lockring and hub had just passed by each other.

That was the sign that the two pieces were oriented to start turning clockwise and threading them together.  At this point, I could maybe turn the lock ring a quarter turn before moderate hand pressure was insufficient to turn any further.  I looked carefully at the orientation of the lockring to hub to help gauge whether it was cross threading or not.

I repeated this several times until I was convinced that I had things properly set up.  Then I took a bottom bracket lockring spanner and began every so gingerly giving the lockring a little pull and deciding from the tactile feedback whether the lockring was indeed properly threaded.

As with the hand threading, I backed out of this completely several times before I was satisfied with the thread engagement.  Eventually, I worked it through a full turn or so with the spanner, after which the lockring spun the rest of the way onto the hub with only finger pressure.

Having to only use finger pressure for all but the first turn was an especially good sign that the hub was salvageable, as this, in combination with the good appearance of the threads, indicated that the thread damage was limited to the first thread course.

After another burnishing and cleaning of the hub threads, I successfully repeated this meticulous process with the tightly fitting bottom bracket lock ring.

My spirits were rising, then, as I then went for the full enchilada with a freewheel with excruciatingly cleaned threads.  I was also a bit nervous, since on initial engagement, it is harder to visual judge the line up between the hub and a freewheel than it is with a lockring.  It is also a lot easier to inadvertently damage threads with a big heavy freewheel than it is with a tiny little lockring.

But to my overwhelming joy, on first attempt and only using finger pressure, the freewheel spun onto that hub like the hub just came out of its factory packaging (with a little grease applied to threads first, naturally).

So here is wheels saved by a last minute stay of execution on the Finest.  Readers who have been following the Finest saga may note that I've been fitting up some fender and to popular acclaim have gone with steel braided brake cable housing.  Better pictures will be forthcoming in future posts:


Monday, April 26, 2010

Bling O' The Day - Dia Compe Quick Release Straddle Wire Carrier

The whole reason I'm finally building my 1972 Fuji Finest frame is simply so I can use a set of these sweet Dia Compe straddle wire carriers with integrated quick release.


If there is a cooler straddle wire carrier than this, I'd sure like to see it (and buy about 20...).

After using a set on the Finest, I've still got one set plus a single orphaned one, which I'm thinking might make an Otaku-ish key fob.

Sunday, April 25, 2010

1972 Fuji Finest Build

I made some progress with my 1972 Fuji Finest.  The Newbaums cloth handlebar tape took four coats of shellac rather than my customary three coats.  The cloth is a lot thicker and consequently soaks up a lot of shellac.  Similarly, the weave pattern seems more prominent.  But at four coats, I was quite happy with the feel under hand as well as the color - it is nearly a perfect match now for the maroon Brooks Imperial saddle:


It is almost ready to go, just need to hook up cables and so forth.  However, I also picked up a set of SKS Chromoplastic fenders to install, so that will add a little time before this is on the road.

The full list of bits/pieces for enquiring minds:

Front Derailleur: Compe V
Rear Derailleur: Suntour V Luxe GT
Crankset: Specialized "Flag" triple 50/39/28, including original BB
Freewheel: IRD 13/32
Headset: Sprint Alloy, JIS, hand me down from earlier Superbe
Stem: Nitto Technomic
Bars: Nitto Olympiade, 42cm
Bar tape: Newbaums maroon
Brakes/Levers: NOS set of early Dia Compe Gran Compe
Pedals: MKS Touring
Seatpost: SR Laprade 26.6
Saddle: New Brooks Imperial, maroon
Rims: Sun CR18 700c, 36h, polished
Spokes: DT straight gauge
Tires: Specialized Nimbus Armadillos, 35c
Hubs: Campy Nuovo Tipo
Shifters: Suntour Power Ratchet DT
Bell: Crane, made in Osaka no less, available through Rivendell.

And lets not forget the vintage Christophe Special toeclips adorned with VO toeclip leathers and VO toeclip straps with buckle pad.

Dia Compe Straddle Wire Carriers And Lord Of The Flies Countdown

In an earlier post, we looked at several blingy straddle wire carriers.  I mentioned that I had another set with an integrated quick release.  Today, I dug these out because I am installing a NOS set of very early Dia Compe Gran Compe centerpulls on my 1972 Fuji Finest.

These early Gran Compe brakes are only subtly different from the standard Dia Compe centerpulls.  The caliper arms are more slender, nicely polished, and anodized.  Similarly, some of the other brake hardware, like mounting bolts, springs, etc. is more nicely polished/chrome plated than on the standard centerpulls.  Finally, the lever bodies have a bit more elegant, less blocky profile.

However, they still used the prosaic bent metal straddle wire carriers, so I am replacing them with these:


I've applied two coats of shellac to the maroon Newbaums cloth handlebar tape.  In the following picture, the color is a little uneven because it is still drying, but we can see that it will ending up matching the maroon Brooks Imperial saddle quite nicely.  I'll go with at least one more coat.  Recently, I've been going with about three coats of shellac, which seems to seal cloth handlebar tape nicely but doesn't get the glossy frosted doughnut look. However, the Newbaums sucks up so much shellac I may need a fourth coat for the result I prefer.


As you can see, I've moved the bike into the kitchen to dry the shellac more quickly - it is still rather chilly in the basement. Since the Finest was sitting there so conveniently, I got to work installing the brake calipers.

When fitting up the semi-circular brake mounting spacers that mate to the brake bridge and fork, I apply a little grease to the contact area just as I do with anything that clamps to the frame such as derailleurs, downtube shifters, brake cable housing clips, etc. My theory is that this tends to exclude the moisture that collects at this type of interface and inhibits the rust formation so commonly found under such fittings.

I'm still debating whether to use the Gran Compe calipers or swap them out for these Dia Compe 510 calipers. In addition to looking a little more slick and offering more pad adjustability, I'd bet the arms are stiffer due to the section containing the brake pad slot being orthogonal to the direction of the caliper arm motion:


And finally, now we know for sure how thin the veneer of civilization - five weeks from Mrs. Otaku's departure for Japan to the point that I'm working on bicycles in the kitchen...

Saturday, April 24, 2010

Newbaum's Cloth Handlebar Tape

I've been getting a little busy finally building up my 1972 Fuji Finest frame, which is shaping up as a rough/ready rider assembled from whatever I find on my shelfs.  There will be more on this bike in a future post when I'm done; for now I want to talk about taping the handlebars.

A couple of weeks ago my friend Kev scored a purple 1978 Fuji S12-S.  This had pretty crummy handlebar tape, so we ordered some purple Newbaums cloth handlebar tape from Rivendell.  I figured what the heck and ordered 4 rolls of the maroon featured in an earlier post.

Today, I finally got around to installing some of this.  Keeping with the spirit of this Finest build - nothing fancy - rather than any foo-foo diamond wrapping, I just did a straight from the old school spiral wrap starting at the bar ends and ending at the bar sleeve.

I also wanted to see how quick I could do this, as I had heard it was very easy to install.  So rather than my usual futzing around with wrapping a couple of turns, eyeballing, then maybe doing over, I just committed to a quick wrap, like in a production situation.

The one thing I did do was remove the paper backing from the tape and rerolled it before putting it on the bars.  I find doing this saves a lot of trouble when wrapping with paper backed tape.

Well, the Newbaums is pretty impressive.  It doesn't take much effort to make it lie flat, unlike Tressostar where one sometimes has to pull pretty hard on the tape.  It went very quick, maybe 10-15 minutes to wrap the bars.

So now, even cavepersons can have nicely wrapped handlebars. 

Here is the result, again, a little uneven, but I was trying to work quick.


The Newbaums tape is slightly narrower than Tressostar or Viva tape, but it is much thicker. Plus, the Newbaums is longer, so you don't end up in the all too common and sad situation where one runs out of tape before running out of handlebar.

The tap thickness is readily apparent when gripping the bars, as it feels noticeably plusher under the hand than with the other two common brands.

I'm trying to think of something bad to say about this stuff, but I'm pretty much of a loss other than to ask how come these guys didn't start selling this stuff years ago. And best of all, it isn't any more expensive than other brands.

How they achieved this producing this tape in the U.S. is a bit of a mystery - maybe I'll write and ask them.

The maroon tape is a very striking color that is well represented in the pictures above. I was tempted to leave it as is, but I wanted to run it through the whole shellac process as well as the fact that with shellac, this color will probably better match a maroon Brooks Imperial that is going on the Finest.

The first coat of shellac is drying as I write this. The thickness of the tape is very evident during application of the first coat, as it soaks up a extraordinary amount of shellac. My advice is to be pretty careful during this first coat to make sure that the tape is fully saturated, otherwise there can be unevenness in the color that is difficult to work out in later coats.

There will be more pictures of this in a day or two when I finish up the 1972 Fuji Finest.

Friday, April 23, 2010

Planet Bike Cascadia Fenders

The weather forecast is rainy for all next week, so I figure this would be a good time to address the fender question for my new 1981 Fuji America.  I have been working up my 1972 Fuji Finest frame into a sort of rough and ready rider, but it doesn't look like it will be ready for a Saturday ride, when the week of rain commences.

Several things about fenders have been on my mind with respect to the America.  The first is that I'm enjoying riding around on a fenderless, relatively skinny tire light bike.  The second is that my thought has been that the way the America is shaping up, black fenders would look nice.  The third is that I've been drinking the metal fenders/fat tire koolaid for ten years now, and the kicks are getting harder to find.  Finally, the plastic fenders available now address the dissatisfaction I had with them the last time I bought a pair (coverage/looks) - this was around eight years ago.

Newer plastic fenders provide much greater front wheel coverage than the ones of old, which where doing good to get much below the axle.  They are still a little short, but certainly as long on the rear of the front wheel as a Berthoud without a mudflap.  That is fine with me, as I've found on my unpaved road riding that, under certain atmospheric conditions, a really low riding mudflap tends to direct sticky mud drops into the fender, clogging it up fairly quickly.

Similarly, some newer plastic fenders avoid the ungainly angular look and have a smooth curved profile, which I prefer.

So I rode over to Citybikes, conveniently located alongside the Capitol Crescent Trail, and picked up a set of Planet Bike Cascadia Road Fenders in black, 35mm width.  These are very hard, shiny plastic with pretty sleek mudguard extensions.

After purchasing these, it became apparent that the easiest way to get them home was mounted on the bike, so I set to work installing them with my customary ride toolkit.  The America's economy with tire clearance combined with Pasela Panaracer 25c tires that are larger than many 28c tires made for a tight fit.  This, along with some ad hoc blacksmithing on the front fork mount lengthened the installation time, but in 15 minutes I was on my way.

While I was installing these, I had two separate conversations with onlookers who expressed appreciation in my vintage bike.  The first was a fellow on a gorgeous tangerine waterford with a tangerine carbon fork.  The second was a duo of older British chaps who observed that on this bike one had to shift "by feel".

That inspired me to riff about how us friction shifters were the Jedi Knights of cycledom, just letting The Force guide our hands and unconscious minds to the next gear perfectly.  We all had a chuckle about that before we headed out on our respective ways. 

I still need to trim the stays, but here is what the fenders looked like when I arrived home:


This doesn't look too shabby for a tool-challenged parking lot installation.

The front fender was a little rattly, so I put a little scrap of black bar tape on the the front fender where it was contacting the underside of the brake caliper.  This quieted things down nicely.  I did note on the unpaved section of my ride home that they were a lot quieter than metal fenders with the bits of gravel flying off the tire pinging on them.

Overall, I'm quite satisfied with these.  In particular, the mudguard extensions seem quite nicely done.

And wow that I've got the stay adjustments set, I can take install/uninstall these rather quickly, so I'm not locked into full-time fenderdom.  They do look okay, but having fenders on a bike tends to slow me down a bit out of concern for stick and other fender jamming incidents.

In general, the Planet Bike Cascadia fenders do appear to be a quality, attractive product, much improved from the plastic fenders of five or ten years ago.  I paid LBS full freight for these, which made them not a whole lot cheaper than Berthouds or Velo Orange metal fenders, but for what I want for this bike, I believe they are the better choice.

Wednesday, April 21, 2010

New Hub From Paul Components

Following my recent writeup on the Electra Ticino hubs, I did a quick scan of the some manufacturers to update myself on what may be the the next object of my hub desires.

On the Paul Component Engineering site, I saw a nice set of six-cutout high flange hubs.  Here is the front, also available with a quick release axle:


But alas, the rear hub, pictured below, is only available in track/flip flop configurations.


So I sent off an message to their posted contact  email asking if a multi-speed freewheel and/or freehub version(s) of this hub would be available.

Imagine my delight when I received this response from The Paul, who also granted me permission to publish it:

"We soon will have a freewheel version called the Jono hub. It comes with spacers to fit nearly every frame/freewheel combination.

Have a good ride,

Paul"


That's pretty exciting news, a modern production and presumably high quality hub that is very similar in appearance to classically styled high flange hubs.

And seeing the allen fixing nuts on these hubs made me wonder, yet again, do I really need quick release levers on any of my wheels?  If I have my little toolkit with me, which is virtually always, I have a small set of allen wrenches in there.

Monday, April 19, 2010

We Get Mail - Andrew's 1987 Fuji Titanium

This just in from Andrew, whose Touring Series IV we just featured.  Andrew has got Fuji fever bad and is on a roll.

"Fuji Otaku,

Thanks for hosting my adventures into and subsequent fever caused by Fuji acquisition.  Does vintage Titanium from the Steel age qualify as "non carbon" vintage cycling?

As mentioned previously, a couple weeks after I picked up my first Fuji (the Touring Series IV), I had talked about the bike finishing process so much that all friends and coworkers were aware of it.  That’s when one of my coworkers asked if I could grab something out of her car and when I went down there, the attached was staring back at me.  

Over lunch she asked if I wanted to bring it into my office (I did) and she gave me her husband’s email so I could initiate negotiations.  I began with, “I didn’t wake up this morning planning on buying a bike and can’t give you what its worth but can promise it a good home”.

I learned that Frank purchased the ride from a bike shop owning friend in Wichita where it had been on display many years.  Upon purchase he immediately switched out the Suntour components for Dura-Ace and got rid of the tubular tires.  The frame was a little small for Frank so he didn’t log as many miles as he planned with it so it waited for years in the garage (from what I’m told, Frank has a fleet of other high end bikes).
 

At the price I paid for it, it was basically a gift and other than replace the tires/tubes, I’ve had to do nothing to it.  The ride is darty (responsive) and quiet (I’ve never previously accelerated up some of the hills which now I can).  We put it on a scale at the local bike shop and it weighed a little over 21 lbs.
 

I rode both the Titanium and the Touring this past weekend.  One would think they could satisfy my Fuji needs, but then when at a wedding reception Saturday (I rode the Touring bike to) a 20-something-year old commented, “hey, my dad has a Fuji that’s been hanging in his garage since I was a kid”, I asked, “what kind?”…”white”…”sight unseen, tell him I’ll give him $100 for it”. 

I don’t feel the fever subsiding.
 

Until then,

Andrew"

Andrew,

That is a phenomenal score.  While it may not sit well with some C&V riders, titanium is a-ok with me.  In my opinion, it has the desirable characteristics of steel while being lighter and more corrosion resistant.

Beyond that, I was relieved to see the "Made In Japan" sticker.  We're sticklers for that sort of thing around here.

I looked around the catalogs on classicfuji.com, looks sort of like a 1987, which would be the first year the catalogs offered a titanium model.  Maybe some helpful reader has more info.

And now you've went and done it, you've given me a flare up of my ever incubating Fuji fever.  But no telling how long I'll have to wait for one of those to come along.

Until then, I will have to console myself with the fact that the claimed weight for my 1983 Fuji Opus III is 21 pounds as well.

Best,

Fuji Otaku


Sunday, April 18, 2010

Electra Ticino Hubset Goes On The Road

In the last installment of the Ticino hubset saga, we were just going gaga ogling these fine new production hubs from Electra Bicycle Company:


However, as much as I liked just having these gleaming on my desktop, it was really time to get these into some wheels. But before going into that, I want to discuss the hubs in a little more detail.

In addition to their great looks, the Ticino hubs are obviously a high quality item. The machining is very precise. The hubs are anodized, but with such care to polishing the substrate that they are some of the shiniest anodized alloy parts I've ever seen.

The styling is obviously a tribute to the C-Record sheriff's star hubs, but with some more modern lines. To be specific, there is no relief line between the spoke ring and the star "arms". Interestingly, there is such a relief line on the inner side of the flanges on the front, so it was obviously a stylistic choice rather than a cost-cutting measure.

And Electra is taking no chances about whether or not it is an urban myth that C-Record high flange hubs were prone to failure. The spoke rings and star arms are all pretty beefy and the corners of the cutouts have a fairly large radius that will avoid stress concentration.

The stainless steel fitments and axle are similarly polished and seem nearly surgical grade.

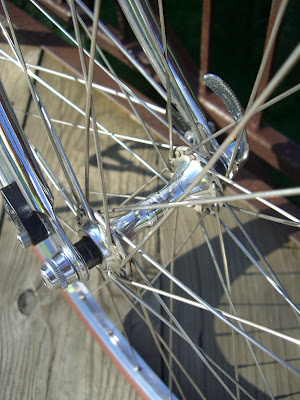
Here is a closeup of the non-drive side of the rear hub:


I got curious about what was beneath that pretty housing, so I got out the 15mm and 17mm cone wrenches and went exploring:


Nothing to see here folks except the ceramic cartridge bearings that make these hubs silky smooth. As a note, an Electra rep informed me that the grease ports on the axle housings are functional in that there is no inner seal and one could actually grease the cartridges this way. I found that oddly soothing, knowing that this grease port and clip weren't just completely non-functional costume jewelry.

However, these grease ports will probably be used about as often as they were on old Campagnolo hubs, which is to say nearly never.

Overall, these things are a simply stunning combination of form and function. But I would run the risk of being a total Electra fanboy/shill if I didn't point out some issues.

Despite looking over these in some depth, I really couldn't find much to kvetch about on the hubs themselves. The front hubs don't have the glitzy alloy bearing cover as does the non-drive side rear - the spacer nut bumps up against the bearing. That is pretty small potatoes, to say the least, and is just a matter of taste.

The quick release skewers, while being every bit as precious as the hubs, had two small nits that are petty and picayune on my part. The first was the method of attachment of the quick release lever:


As you can see, it goes all the way through the cam housing and is secured by a circlip. During a major overhaul, I like to disassemble, clean, and lubricate QR mechanisms and circlips are a big PITA.

Beyond that, it is a bit of an agricultural-looking touch on what are otherwise beautifully detailed hubs. On C-Record and Suntour Superbe Pro quick releases, the lever end is blind. Here is a Superbe Pro (I have a C-Record downstairs, it looks largely the same..):


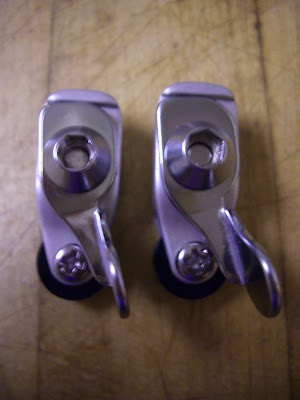
The second nit is the turn clip on the quick release adjustment nut. It is loose in its holes. Traditionally, these clips are a bit of an interference fit so that they don't move with gravity. In addition to lending a bit of cheapo-ness to the quick release, the clip can actually jangle around a bit. When I'm riding, any little tink or rattle gets my attention and makes me start worrying about what the heck is going on.

In this photo, we can see that the Ticino quick release nut turning clip can't stand up to the competition:


From left to right, we have Campagnolo Croce d'Aune, Maillard/Spidel 700, Suntour Superbe Pro, and finally, Electra Ticino wilting a bit.

Me, I'm certain that when Electra reads this, they will be positively mortified and rectify this dreadful situation immediately...

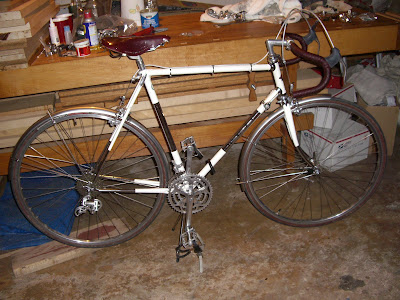
But seriously, these are uber-fine hubs that I couldn't wait to get on the road and all this QR stuff is extreme bike part geek pickiness that matters not a whit to anyone. So I assembled all the materials:


The rims are Velocity Synergy, 32 hole (like the hubs, obviously). The spokes are DT stainless, butted. For durability, I go with brass nipples and for traditionalism, Velox rim tape. The hubs need no introduction nor does the box in which they have been residing.

Then, after the pasta but before the wine, a miracle happened and voila!:


This was my first experience with Velocity Synergy rims and it was a very good one. They built up very much in round with even tension between the spokes.  Also, the wheelbuilding dimensions Electra sent me for these hubs were quite accurate.  I didn't double check them and just plugged the numbers into Spokecalc - the resulting spoke lengths worked perfectly.

I also have to put in a plug for my truing stand:


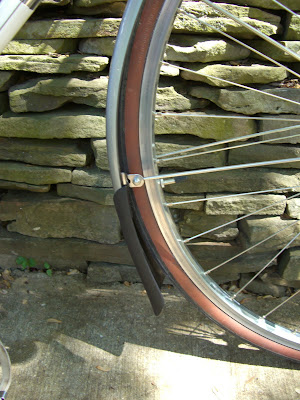
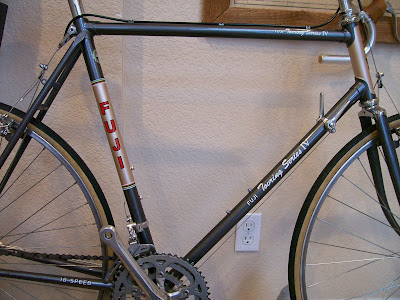
Wheelbuilding is an exercise in nitpickiness. One of the nits is how to line up the label - traditionally, this is done so that the label is viewable via the valve hole. However, the Ticino brand is engraved around the circumference of the axle housing, so what is an obsessive compulsive wheelbuilder to do?

By the way, I do mean engraved rather than the cheaper laser etching so common these days.   Maybe it was done with a laser, but the power must have been turned up pretty darn high, as the engravings are pretty deep and are definitely not going to come off with a little simichrome.

But back to the point - the obvious answer for the hub/rim alignment issue in the Ticino case is to line up the oil port with the valve hole, as one can barely see in this shot:


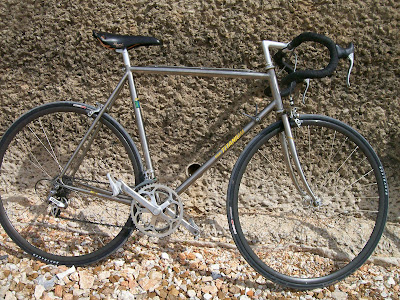
The next day, it was time to saddle up and take these out. But first I had to run up to the LBS and pick up a cassette. I ended up with a pretty decent Shimano 11-30 8 speed. With that option, I decided it was high time to swap the existing 52/36 chainrings for 48/34 ones.

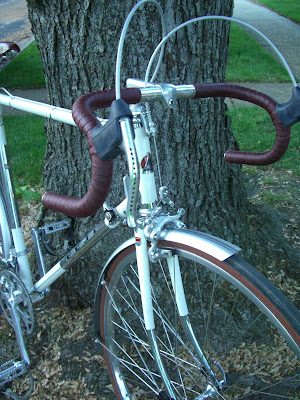
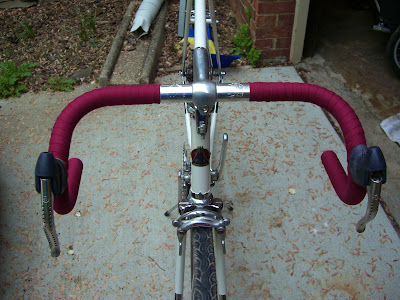
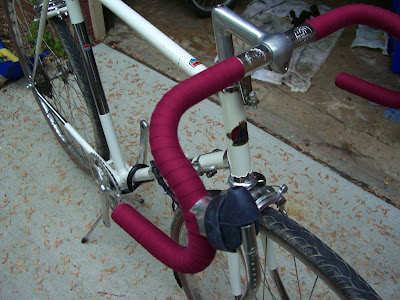
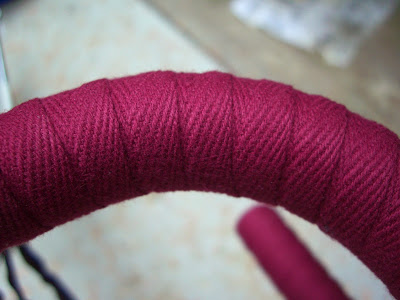
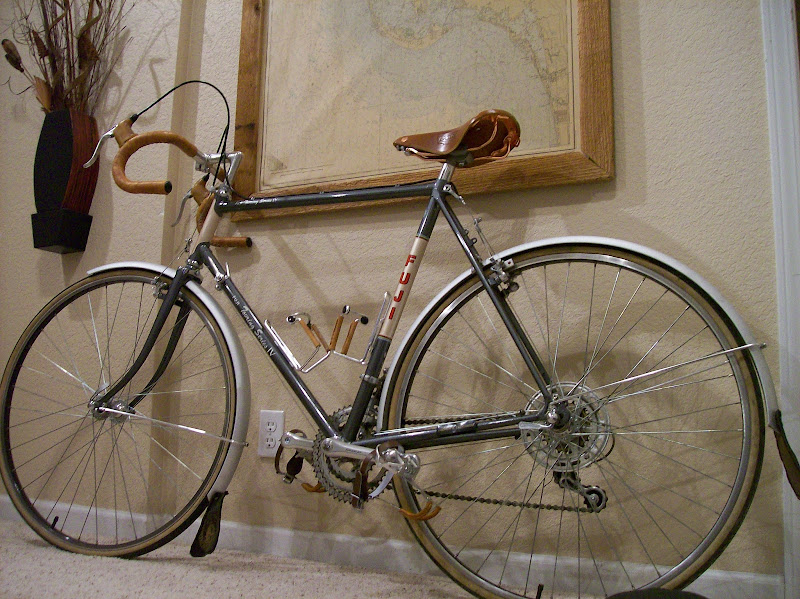
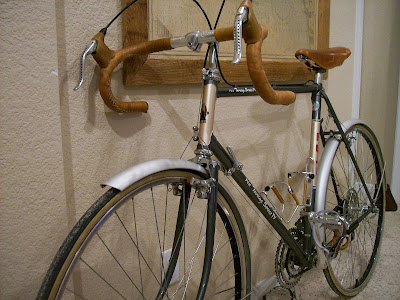
Beyond that, I snagged the leather wrapped bars from my Fuji Gran Tourer. I've been considering leather wrap as the final handlebar treatment on this bike, so this would give me an actual look.

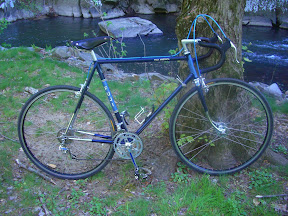
With that work accomplished, I headed out for the secret Fuji Otaku test track, which runs about 25 miles through Rock Creek Park and then up the Capital Crescent Trail.

Of course, I stopped for pictures:


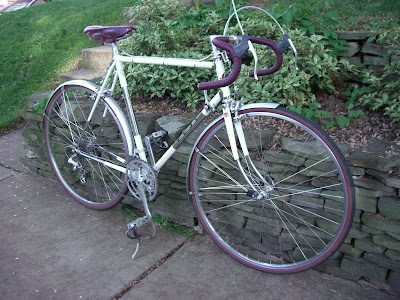
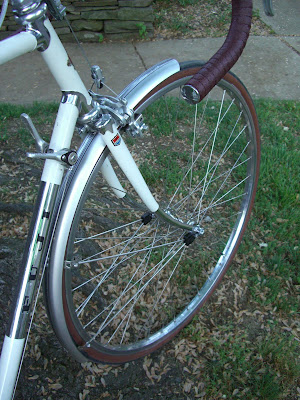
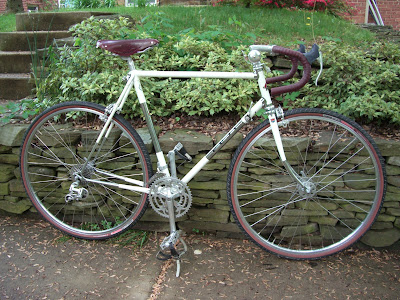
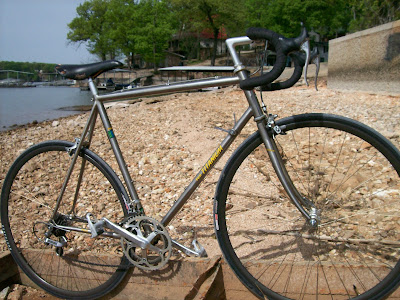
I was a little concerned about going with black rims, but I am delighted with the results. This is definitely in line with the hot rod Lincoln idea I've got going on with this bike. The black leather Fujitoshi stitch-on handlebar wrap is tearing it up as well.

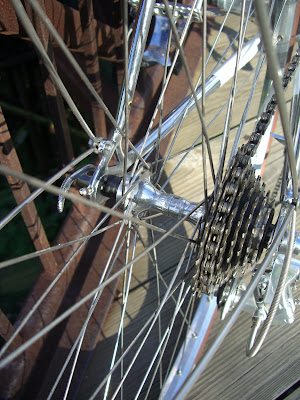
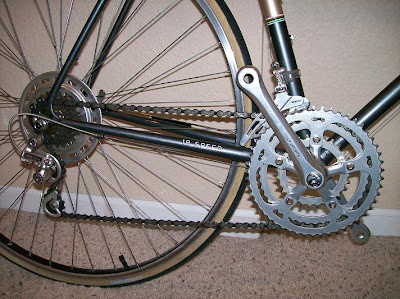
The hubs received a little end user love and tenderness in the form of blue paint in the cutouts.  Note the aforementioned relief line on the inside of the front hub flange:


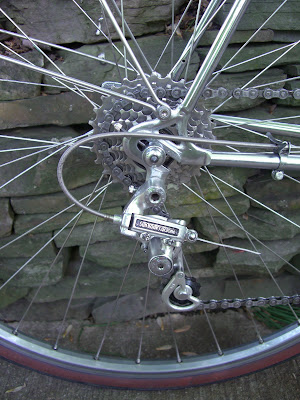
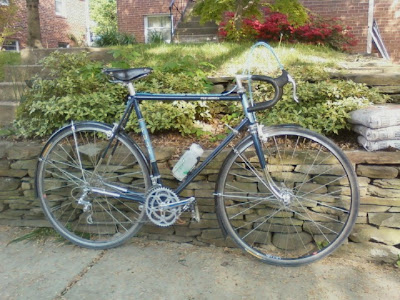
This matches up with a lot of blue detailing showing up elsewhere on the bike. By happy coincidence, the label on the cassette is blue:


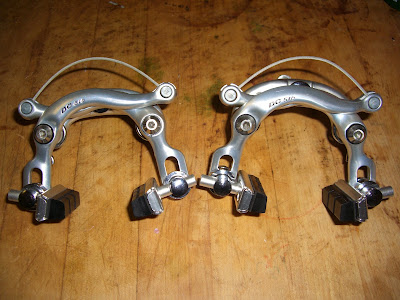
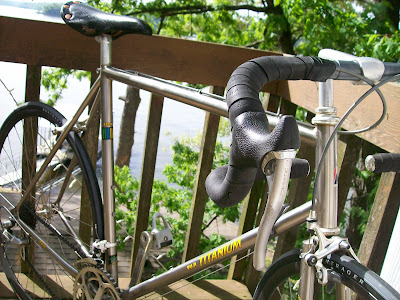
The Fuji America is also sporting some Suntour Superbe pedals now in addition to previously installed Superbe bottom bracket, brake calipers, and downtube shifters. When I finalize this bike, it will also have Superbe brake levers:


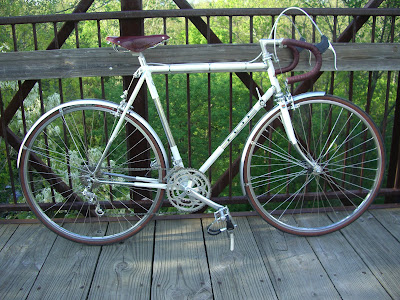
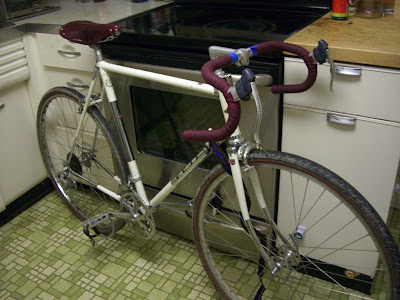
Here is another shot of this bike, which is really shaping up with a lot of help from the Ticino/Synergy wheelset:


In my humble opinion, the Ticino hubs and black Synergy rims suit this bike to a tee.

As for the test ride, the hubs were quite smooth and uncomplaining. The freehub has an audible tick but is rather quieter than period freewheels. For me, this is definitely a good thing - a freehub or freewheel that makes a little noise can alert pedestrians to a cyclist's approach.

In summation, I'm delighted with my new wheels and the Ticino hubs. A little bit of attention to detail on the QR skewers and we won't have anything to complain about at all, which would be quite a novelty.

We Get Mail - Andrew's Touring Series IV

Truth be told, this is a composite of several emails between Andrew and me:

"Fuji Otaku,

Well, I see you recently did a spread on Todd’s Fuji Touring Series IV, but dang-it, perhaps we can compare and contrast our styles and taste in fixin ‘em up…here’s some pics (since then I’ve taken fenders off to increase functionality [yeah, I said it] and added a wooden rear rack)

The story behind this acquistion:

A couple weeks ago I had a deposition starting in Springfield at 6 am so decided to head down the night before.  Not wanting to pass up any potential hidden treasures, I checked Springfield’s Craigslistings prior to departure.  When I saw the bike I too had to catch my breath but calmly emailed the owner offering him $25 below his asking price if it was in as good condition as the ads/pics suggested and if it fit me.  

In the meantime, I lurked around some classic/vintage bike forums and learned that this Fuji was from “the golden era of touring” and sought after.  It is designed to be loaded down with packs and panniers and ridden thousands of miles, it has extra spokes mounted to the frame in case you need to replace one in the countryside, it is made of steel but still lightweight.
 

When the student-aged man answered the door, I asked him the history behind it, “I bought it from a friend of mine’s dad who hadn’t really ridden it, but the frame was too big for me (he was 5’8”ish) so its been stored indoors since”.  

When he opened his garage, I immediately said, “I’ll take it” and handed him the cash without so much as touching the bike.  I was prepared to test ride it and had researched the various considerations and tests when buying a used bike, but the bike was an absolute diamond, I didn’t want the guy to reconsider-I wanted to get the bike on my Jeep and leave.  As I was loading it, he mentioned what he had paid for it (which was more than I was paying him for it) and a guilt washed over me prompting me to insist he accept more money for it.  I fully disclosed that in the right market (Portland, Seattle) the bike was worth considerably more.
 

Since that time I have spent many times more the purchase price on parts and accessories making this my dream machine.  Just yesterday, my saddle arrived.  It is a Brooks B-17 Champion Special in Honey Brown (They are hand made in England out of leather and have offered that model of bike seat since 1898).  I stitched elkhide on the handlebars, stitched leather on the water bottle cages/pedals and fashioned my own mudflaps out of old ‘executive’ leather folders.  I’ve already planned a couple trips for this summer (setting out east to Missouri wine country) and will forward pics once I complete the finishing touches.

I’ve also attached pics from a ride I took along the Missouri River on the Katy Trail (our state’s long rails to trail route) and the Frisco Highline trail (our state’s 2nd longest rails to trail route) and my smiling companions bike which was stolen off Craigslist for $60 (note the new handlebar mounted drink holder on the Fuji).

This has all happened rather quickly (within the last month I got the Fuji fever bad which corresponded nicely with our warming weather) and just this week one of my coworkers brought in a Fuji Titanium bike from ’87 that her husband acquired many years ago from a bike shop owning friend.  It was in similar pristine condition, the frame was a little small for him, and at the price I paid for it, he basically gifted it to me (thanks Frank)…pics to follow.


Back to the growing Fuji Fleet,

Andrew"

Andrew,

First, I want to say good on ya for doing right by the seller of your extremely fine Fuji Touring Series IV.  I have no doubt that at almost any reasonable price, this is a far better deal than anything at the LBS.

Second, you are right - the Touring Series bikes from the mid-80's were the best equipped and designed Fuji touring bikes.  At that precise moment in time, high-end touring bikes were a very competitive market niche and Fuji pulled out all the stops on the Touring Series line.

Third, we are definitely going to want to see pics of that titanium bike when you have a chance.

Finally, I'm glad to see that you are putting this bike to intended usage.  I'd also like to add that you and your companion look every bit as buff as your new bike.

Thanks for writing!

Fuji Otaku